- Table View
- List View

Pathways to Literacy, Year 4, Stage 5, Set B: Baboushka (PDF)
by Moira AndrewChristmas is such a busy time! Cleaning, cooking, making, mending... Those were the things that kept Baboushka busy. So she missed her chance to travel with the wise men. Then she found a way to bring Christmas love to everyone. A traditional tale of warmth and wisdom.

Chronicles of Narnia, Book 2: The Lion, the Witch and the Wardrobe
by C. S. LewisPeter, Susan, Edmund and Lucy are evacuated to a house during the war wherein lives a vague professor. Left much to their own devices, they find a way into another world - Narnia - and discover Aslan, the lion king in hiding.
13 Amp plug and heater (UEB Uncontracted)
by Rnib BookshareThis page shows a labelled diagram of a UK 13 Amp plug connected to an electric heater. The plug has its top removed to reveal its internal wiring and the heater has its cover removed. There is a locator dot shown, which will be at the top left of the page when the image is the correct way up. The heater is to the left of the page. It has its cover removed. Its components are attached to a square backing plate that fills most of the left of the page. At the top, are the two heating elements made of coiled wire connected to the switch to the right and to the mains cable down and right. The earth wire is screwed to a terminal on the bottom of the heaters backing plate. The thick cable extends from the bottom left of the heater to where it is clamped to the plug on the right of the page. The three wires emerge from the cable and connect to the three screw terminals marked neutral, earth and live. The fuse is shown just down the page from the live terminal.
13 Amp plug and heater (UEB Contracted)
by Rnib BookshareThis page shows a labelled diagram of a UK 13 Amp plug connected to an electric heater. The plug has its top removed to reveal its internal wiring and the heater has its cover removed. There is a locator dot shown, which will be at the top left of the page when the image is the correct way up. The heater is to the left of the page. It has its cover removed. Its components are attached to a square backing plate that fills most of the left of the page. At the top, are the two heating elements made of coiled wire connected to the switch to the right and to the mains cable down and right. The earth wire is screwed to a terminal on the bottom of the heaters backing plate. The thick cable extends from the bottom left of the heater to where it is clamped to the plug on the right of the page. The three wires emerge from the cable and connect to the three screw terminals marked neutral, earth and live. The fuse is shown just down the page from the live terminal.
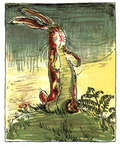
The Velveteen Rabbit (or How Toys Become Real)
by Margery Williams William NicholsonOriginally published in 1922, The Velveteen Rabbit has delighted young readers for nearly a century. The story follows a young boy who’s given a stuffed rabbit as a Christmas gift. After the rabbit befriends other nursery toys, he comes to the realization that he wants to become a real rabbit. Eventually, the boy becomes ill and is relocated; his room is then disinfected and all the boy’s toys are thrown out, including the velveteen rabbit. The rabbit sheds a real tear causing a fairy to appear and turn him into a real rabbit. This edition includes full-color illustrations, with image descriptions,from the original illustrator, William Nicholson. Each image accompanies the text to enhance young readers’ experience and immerse them in this captivating story. Reprinted hundreds of times since its initial publication, The Velveteen Rabbit is a timeless children’s classic lets young readers experience the true magic of friendship, love, and being honest with oneself. In 2007, the book was named one of "Teachers’ Top 100 Books for Children” by the National Education Association.
Butterfly lifecycle 6 (Adult) (UEB Uncontracted)
This image shows the butterfly viewed from above. Its body is in the centre of the page with the head at the top of the page. There is a locator dot shown, which will be at the top left of the page when the image is the right way up. There is a scale at the bottom of the page. In the top centre of the image are the tips of two antennae which stretch down to the head. It has two large eyes showing with two antennae stretching out above it. Down from the head is the thorax with two wings to the left and right. The fore wings in the top half of the page have an orange band in the middle. The wing tips to the left and right have bright white patches and spots. The hind wings have a band of orange on the outer edge to the left and right. All wings have tiny patches of white on the edge in places and some small patches of blue near the edges but these are too small to be seen on the tactile image. Down from this is the segmented abdomen. The legs are not shown.
Butterfly lifecycle 6 (Adult) (UEB Contracted)
This image shows the butterfly viewed from above. Its body is in the centre of the page with the head at the top of the page. There is a locator dot shown, which will be at the top left of the page when the image is the right way up. There is a scale at the bottom of the page. In the top centre of the image are the tips of two antennae which stretch down to the head. It has two large eyes showing with two antennae stretching out above it. Down from the head is the thorax with two wings to the left and right. The fore wings in the top half of the page have an orange band in the middle. The wing tips to the left and right have bright white patches and spots. The hind wings have a band of orange on the outer edge to the left and right. All wings have tiny patches of white on the edge in places and some small patches of blue near the edges but these are too small to be seen on the tactile image. Down from this is the segmented abdomen. The legs are not shown.
Butterfly lifecycle 6 (Adult) (Large Print)
This image shows the butterfly viewed from above. Its body is in the centre of the page with the head at the top of the page. There is a locator dot shown, which will be at the top left of the page when the image is the right way up. There is a scale at the bottom of the page. In the top centre of the image are the tips of two antennae which stretch down to the head. It has two large eyes showing with two antennae stretching out above it. Down from the head is the thorax with two wings to the left and right. The fore wings in the top half of the page have an orange band in the middle. The wing tips to the left and right have bright white patches and spots. The hind wings have a band of orange on the outer edge to the left and right. All wings have tiny patches of white on the edge in places and some small patches of blue near the edges but these are too small to be seen on the tactile image. Down from this is the segmented abdomen. The legs are not shown.
Butterfly lifecycle 5 (adult fills and dries wings) (UEB Uncontracted)
This image shows the butterfly viewed from the side with its head on the right and its tail on the left. There is a locator dot shown, which will be at the top left of the page when the image is the right way up. On the right one of its two large eyes is showing with one of its two antennae above it. To the left of the head is the thorax with two of its four wings sticking up. To the right is the fore wing with two patches of orange in the centre and up from them, two white spots. The hind wing is to the left, it has a silver spot near the thorax and a grey band on the edge to the left. The wings are still soft bags which will flatten as the veins fill and stretch them flat and hard. Left from this is the segmented abdomen. Three of its six multi-jointed legs can be found, upon which it stands.
Butterfly lifecycle 5 (adult fills and dries wings) (UEB Contracted)
This image shows the butterfly viewed from the side with its head on the right and its tail on the left. There is a locator dot shown, which will be at the top left of the page when the image is the right way up. On the right one of its two large eyes is showing with one of its two antennae above it. To the left of the head is the thorax with two of its four wings sticking up. To the right is the fore wing with two patches of orange in the centre and up from them, two white spots. The hind wing is to the left, it has a silver spot near the thorax and a grey band on the edge to the left. The wings are still soft bags which will flatten as the veins fill and stretch them flat and hard. Left from this is the segmented abdomen. Three of its six multi-jointed legs can be found, upon which it stands.
Butterfly lifecycle 5 (adult fills and dries wings) (Large Print)
This image shows the butterfly viewed from the side with its head on the right and its tail on the left. There is a locator dot shown, which will be at the top left of the page when the image is the right way up. On the right one of its two large eyes is showing with one of its two antennae above it. To the left of the head is the thorax with two of its four wings sticking up. To the right is the fore wing with two patches of orange in the centre and up from them, two white spots. The hind wing is to the left, it has a silver spot near the thorax and a grey band on the edge to the left. The wings are still soft bags which will flatten as the veins fill and stretch them flat and hard. Left from this is the segmented abdomen. Three of its six multi-jointed legs can be found, upon which it stands.
Butterfly lifecycle 4 (adult emerges from pupa) (UEB Uncontracted)
This image shows an opened pupa hanging on the left and in the centre of the page is the recently emerged adult hanging onto the right side of the pupa. There is a locator dot shown, which will be at the top left of the page when the image is the right way up. Its head is in the top centre and the tail in the bottom centre of the page. They are surrounded by an image border. The empty casing of the pupa hangs head down with the bottom half opened up. At the top centre of the page is the end of one of the adult's two antennae, it is still soft from being in the pupa and has not yet straightened and stiffened. To the left of the base of the antenna one of its two large eyes is showing on its head. Down from the head is the thorax with two of its four wrinkled wings sticking out to the right. The upper, larger fore wing has an orange band in the middle and two white spots in the top centre. The smaller hind wing is down from this and has an orange edge on the right. Three of its six multi-jointed legs are to the left of the abdomen, which it uses to hold onto the pupa. Down from this is the segmented abdomen.
Butterfly lifecycle 4 (adult emerges from pupa) (UEB Contracted)
This image shows an opened pupa hanging on the left and in the centre of the page is the recently emerged adult hanging onto the right side of the pupa. There is a locator dot shown, which will be at the top left of the page when the image is the right way up. Its head is in the top centre and the tail in the bottom centre of the page. They are surrounded by an image border. The empty casing of the pupa hangs head down with the bottom half opened up. At the top centre of the page is the end of one of the adult's two antennae, it is still soft from being in the pupa and has not yet straightened and stiffened. To the left of the base of the antenna one of its two large eyes is showing on its head. Down from the head is the thorax with two of its four wrinkled wings sticking out to the right. The upper, larger fore wing has an orange band in the middle and two white spots in the top centre. The smaller hind wing is down from this and has an orange edge on the right. Three of its six multi-jointed legs are to the left of the abdomen, which it uses to hold onto the pupa. Down from this is the segmented abdomen.
Butterfly lifecycle 4 (adult emerges from pupa) (Large Print)
This image shows an opened pupa hanging on the left and in the centre of the page is the recently emerged adult hanging onto the right side of the pupa. There is a locator dot shown, which will be at the top left of the page when the image is the right way up. Its head is in the top centre and the tail in the bottom centre of the page. They are surrounded by an image border. The empty casing of the pupa hangs head down with the bottom half opened up. At the top centre of the page is the end of one of the adult's two antennae, it is still soft from being in the pupa and has not yet straightened and stiffened. To the left of the base of the antenna one of its two large eyes is showing on its head. Down from the head is the thorax with two of its four wrinkled wings sticking out to the right. The upper, larger fore wing has an orange band in the middle and two white spots in the top centre. The smaller hind wing is down from this and has an orange edge on the right. Three of its six multi-jointed legs are to the left of the abdomen, which it uses to hold onto the pupa. Down from this is the segmented abdomen.
Butterfly lifecycle 3 (pupa) (UEB Uncontracted)
The pupa has its head to the right of the page and the tail end to the left. At the bottom of the page is a scale. There is a locator dot shown, which will be at the top left of the page when the image is the right way up. In the right centre of the image the circular shape of the covered eye can be found. Down from this is a covered antenna which goes left to the centre of the pupa. The large triangular area on the right of the pupa is where the wing is developing. The left half of the pupa is its developing abdomen with a small spiracle in the centre of each segment allowing it to breathe. Towards the top of each segment is a small decorative golden stud.
Butterfly lifecycle 3 (pupa) (UEB Contracted)
The pupa has its head to the right of the page and the tail end to the left. At the bottom of the page is a scale. There is a locator dot shown, which will be at the top left of the page when the image is the right way up. In the right centre of the image the circular shape of the covered eye can be found. Down from this is a covered antenna which goes left to the centre of the pupa. The large triangular area on the right of the pupa is where the wing is developing. The left half of the pupa is its developing abdomen with a small spiracle in the centre of each segment allowing it to breathe. Towards the top of each segment is a small decorative golden stud.
Butterfly lifecycle 3 (pupa) (Large Print)
The pupa has its head to the right of the page and the tail end to the left. At the bottom of the page is a scale. There is a locator dot shown, which will be at the top left of the page when the image is the right way up. In the right centre of the image the circular shape of the covered eye can be found. Down from this is a covered antenna which goes left to the centre of the pupa. The large triangular area on the right of the pupa is where the wing is developing. The left half of the pupa is its developing abdomen with a small spiracle in the centre of each segment allowing it to breathe. Towards the top of each segment is a small decorative golden stud.
Butterfly lifecycle 2 (caterpillar) (UEB Uncontracted)
The mature dark grey green caterpillar is shown from the side with its head to the right and a scale at the bottom of the page. There is a locator dot shown, which will be at the top left of the page when the image is the right way up. Its head has one of its two large eyes showing and one of its two antennae above it. Below the eye is one of its mouth parts. It is a hairy caterpillar with spiky hairs on its back and sides. Three of its six thoracic legs are to the right and four of its eight prolegs are to the left. Just above the legs running the length of the caterpillar is a wavy yellow line. The caterpillar ends on the left with its anal clasper.
Butterfly lifecycle 2 (caterpillar) (UEB Contracted)
The mature dark grey green caterpillar is shown from the side with its head to the right and a scale at the bottom of the page. There is a locator dot shown, which will be at the top left of the page when the image is the right way up. Its head has one of its two large eyes showing and one of its two antennae above it. Below the eye is one of its mouth parts. It is a hairy caterpillar with spiky hairs on its back and sides. Three of its six thoracic legs are to the right and four of its eight prolegs are to the left. Just above the legs running the length of the caterpillar is a wavy yellow line. The caterpillar ends on the left with its anal clasper.
Butterfly lifecycle 2 (caterpillar) (Large Print)
The mature dark grey green caterpillar is shown from the side with its head to the right and a scale at the bottom of the page. There is a locator dot shown, which will be at the top left of the page when the image is the right way up. Its head has one of its two large eyes showing and one of its two antennae above it. Below the eye is one of its mouth parts. It is a hairy caterpillar with spiky hairs on its back and sides. Three of its six thoracic legs are to the right and four of its eight prolegs are to the left. Just above the legs running the length of the caterpillar is a wavy yellow line. The caterpillar ends on the left with its anal clasper.
Butterfly lifecycle 1 (eggs and hatching) (UEB Uncontracted)
This image shows a scale, an egg, a hatched egg and a newly emerged caterpillar. There is a locator dot shown, which will be at the top left of the page when the image is the right way up. The scale is on the left of the page. To its right is the dark green egg with pale vertical grooves. To the right of this is another egg which is broken open at the top. On the right of the page is the small pale green caterpillar with its head on the right and its anal clasper to the left. Its head has one of its two large eyes showing and one of its two antennae above it. It has a hairy back. Three of its six thoracic legs are to the right and four of its eight stumpy prolegs are to the left.
Butterfly lifecycle 1 (eggs and hatching) (UEB Contracted)
This image shows a scale, an egg, a hatched egg and a newly emerged caterpillar. There is a locator dot shown, which will be at the top left of the page when the image is the right way up. The scale is on the left of the page. To its right is the dark green egg with pale vertical grooves. To the right of this is another egg which is broken open at the top. On the right of the page is the small pale green caterpillar with its head on the right and its anal clasper to the left. Its head has one of its two large eyes showing and one of its two antennae above it. It has a hairy back. Three of its six thoracic legs are to the right and four of its eight stumpy prolegs are to the left.
Butterfly lifecycle 1 (eggs and hatching) (Large Print)
This image shows a scale, an egg, a hatched egg and a newly emerged caterpillar. There is a locator dot shown, which will be at the top left of the page when the image is the right way up. The scale is on the left of the page. To its right is the dark green egg with pale vertical grooves. To the right of this is another egg which is broken open at the top. On the right of the page is the small pale green caterpillar with its head on the right and its anal clasper to the left. Its head has one of its two large eyes showing and one of its two antennae above it. It has a hairy back. Three of its six thoracic legs are to the right and four of its eight stumpy prolegs are to the left.
Section through a molar tooth (UEB Contracted)
This is an image of a molar tooth. There is a locator dot shown, which will be at the top left when the image is thenbsp;correct way up. The image is surrounded by an image border. The top of the tooth is at the top of the page and the root and jawbone at the bottom of the page. The components are labelled. The enamel, the grinding surface, is the upper layer. Down from this is the dentine layer which is slightly softer and surrounds the inner core which is the soft pulp containing the nerve and blood vessels. Going down to the bottom of the page are the two roots of the tooth which hold it firmly in place in the jawbone. The nerves and blood vessels come from the ends of the roots and go off to the left.
Section through a molar tooth (UEB Uncontracted)
This is an image of a molar tooth. There is a locator dot shown, which will be at the top left when the image is thenbsp;correct way up. The image is surrounded by an image border. The top of the tooth is at the top of the page and the root and jawbone at the bottom of the page. The components are labelled. The enamel, the grinding surface, is the upper layer. Down from this is the dentine layer which is slightly softer and surrounds the inner core which is the soft pulp containing the nerve and blood vessels. Going down to the bottom of the page are the two roots of the tooth which hold it firmly in place in the jawbone. The nerves and blood vessels come from the ends of the roots and go off to the left.